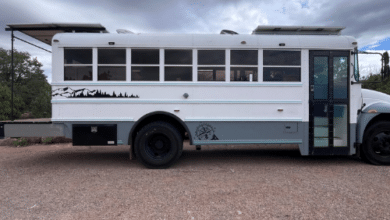
The most important decision when deciding on your skoolie ceiling idea is to leave and modify the existing bus ceiling or to demo and completely rebuild it. Some choose to keep the existing metal bus ceiling to save on cost and time. The better decision is usually to rebuild the ceiling to increase the R-value of the ceiling insulation, install custom features, and improve the design appeal.
In this article, we will walk through the pros and cons of each of these decisions.
Leave the Existing Ceiling
There are a few benefits along with a few downsides to leaving the existing ceiling in the bus. Deciding between leaving the existing bus ceiling and tearing it down comes down to how you will be using the skoolie.
Will you be living in it part-time? Will it be used as a “weekender”? Are you only going to be living in it for a few months? Are you on a strict budget? Do you only have a few weeks/months to convert it? If you answered yes to any of these questions, then you may benefit from keeping the existing ceiling. Leaving the ceiling allows you to save the money you would otherwise be putting into the skoolie ceiling and allows you to be able to finish the build in a shorter amount of time.
However, if you answered no to a majority of the questions above, then keep reading and consider a custom skoolie ceiling.
Below are the pros and cons of leaving the existing metal bus ceiling.
Pros:
- No skoolie ceiling cost
- Shorter build time
Cons:
- Colder/hotter based on lower r value
- Harder to make walls not knowing where you can mount screw to
- Not aesthetically pleasing
Custom Skoolie Ceiling
A custom skoolie ceiling can be beneficial for you if you are converting a school bus to live in it full time and if you are going to be traveling in it full time. If you plan on traveling or living in areas that will experience extreme hot or cold temperatures, then doing a custom skoolie ceiling is better than the alternative as you can give the ceiling a much higher R value than a bus ceiling. A higher R value makes the temperature in the skoolie stay cooler in the summer and warmer in the winter.
Another thing to note is that by doing a custom skoolie ceiling, it is going to be a lot easier to run electrical and install lights. You can run extra electrical wire in case you need to add anything down the road. If you were to leave the existing bus ceiling, it would be harder to wire in things behind the metal panels.
Lastly, if you are going to be living in it full time and calling it your home for the foreseeable future, you may benefit from making it custom. The ceiling can tie together your style by making it cozy and feel more like home. There’s a dramatic difference in the vibe of skoolies that do a custom ceiling and the ones that leave the bus ceiling.
Below are the pros and cons of creating a custom skoolie ceiling.
Pros:
- Skoolie will stay warmer in the winter and cooler in the summer
- Your style will flow with the rest of your skoolie
- Easier to run electrical and install lighting
Cons:
- More time to rebuild
- Can be expensive
Custom Skoolie Ceiling Decisions
Here are a few of the options that you will need to decide on before you dive into building out your skoolie ceiling.
Type of skoolie ceiling insulation: spray foam, havelock wool, or pink sheet insulation. Visit our skoolie insulation article for more about insulating a skoolie.
Plywood or furring strips: This depends on what you want to use as your finishing material and how you will mount your finishing boards. For example, if you want to use nails to hold up the finishing boards, you may want to mount plywood over the ceiling insulation so the boards will have something to mount to.
Skoolie ceiling finishing boards: cedar, shiplap, 1x2s, or reclaimed pallets, sanded plywood, veneer sheeting, tin tiles (there are so many ideas here).
How Much Does a Skoolie Ceiling Cost?
The skoolie ceiling cost will depend on the length of your skoolie, material choices, and the method you choose to build it out.
For example, a full-size bus will cost more than a short bus to finish the ceiling. Below find examples of different ways to finish out your skoolie ceiling and the cost for each of them.
Below find three examples of priced-out skoolie ceilings. Of course, there are many different variations you can do so these are only a few examples. The prices in these lists are for short buses, mid-size buses, and full-size buses, respectively.
These are estimated costs, which will vary based on where you live, the stores available in your area, inflation, etc… however, we did go through all of these at one time so you can see the relative costs between the different materials and decisions made.
Spray Foam, Plywood, & Pallet Board Ceiling (Our Skoolie Ceiling)
- Spray Foam – $400 – $800
- 1/4″ plywood (6 sheets) – $100, $150, $300
- Pallets – free
- Wood blades for sawzall – $20, $40
- Stain – $20, $50, $80
- Water-based sealant – $50, $150, $250
First, we spray foam insulated our ceiling. Then we mounted 1/4″ plywood to the ceiling (6 sheets of 4’x8′ plywood).
After searching craigslist, we got 8 pallets for free and started using a sawzall with a wood blade to detach the planks from the pallets. To get all of the individual boards removed from the pallet we went through numerous wood blades for the sawzall.
After the boards were removed from the pallets, the edges needed to be cut at 45° angles to make the boards into trapezoids when looking at the end of it. This was to lay them in alternating directions to have an overlap between the boards, while also being able to curve to the roof.
Once the individual boards were prepped, we sanded them down, stained them, and sealed them with water-based sealant. We used a brad nailer to mount the boards to the plywood panels.
Check out our skoolie pallet ceiling guide for more detail.
Furring Strips, Spray Foam, & Tongue and Groove Cedar Boards
- Furring strips – $50, $75, $125
- Spray foam – $400 – $800
- Cedar boards – $350, $650, $1100
After you remove the ceiling and existing insulation, you will want to mount furring strips to the metal ribs of the bus. This will be what you screw the cedar boards into. Spray foam the ceiling to get it well insulated then trim the insulation if needed to be sure the boards will fit nicely.
Havelock Wool, Plywood, & Shiplap
- Havelock wool – $150, $300, $600
- Plywood (6 sheets) – $100, $150, $300
- Shiplap – $350, $600, $1,100
Examples of total cost of skoolie ceiling ideas from short bus to full size bus.
| Spray Foam, Plywood, & Pallet Boards | Furring Strips, Spray Foam, & Cedar | Havelock Wool, Plywood, & Shiplap | |
| Short Bus | $600 | $800 | $600 |
| Mid Size Bus | $670 | $1,125 | $1,050 |
| Full Size Bus | $1,470 | $2,025 | $2,000 |
Now that you know about creating a custom skoolie ceiling vs. leaving the existing bus ceiling in and all of the extras that go into a skoolie ceiling build, let’s dive into different skoolie ceiling ideas.
Skoolie Ceiling Ideas
Below are 12 different skoolie ceiling ideas to inspire you on how to finish out your skoolie ceiling if you choose to do so.
Cedar Skoolie Ceiling

Cedar ceilings are one of the more popular skoolie ceiling options. The white-washed cedar fits into many different skoolie design ideas. The cedar panels come as tongue and groove, making it really easy to form the curve of the bus ceiling.
Our friend, Johnny from MilesOSmiles installed a cedar ceiling in his skoolie. Below find the video of him explaining in depth how he installed it.
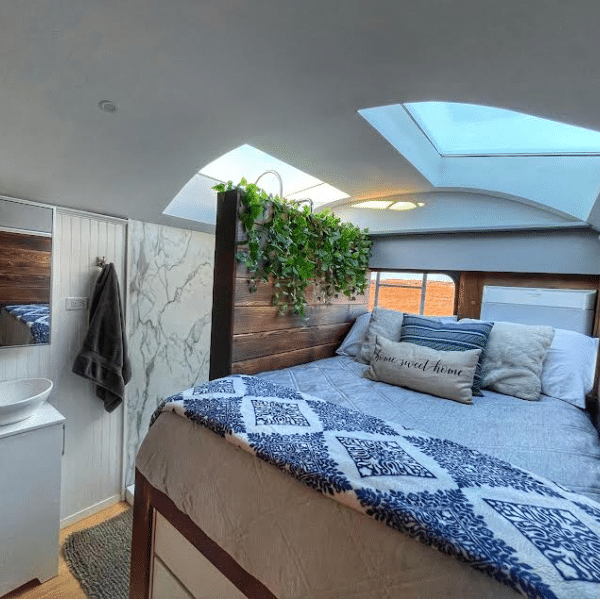
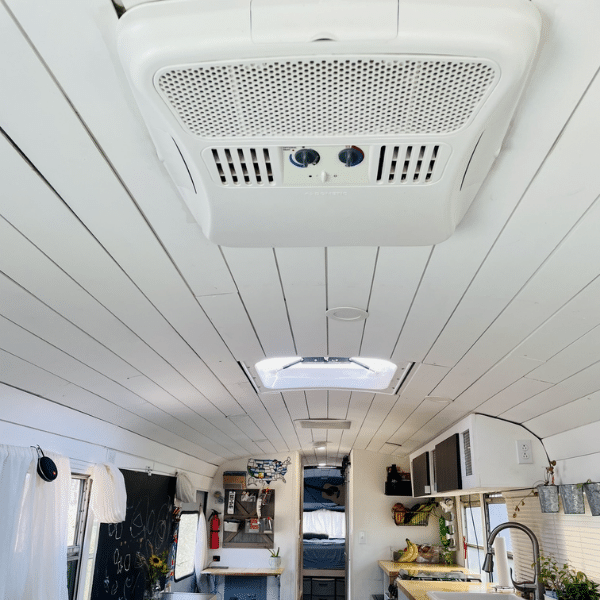
Dark Wood Ceiling In a Skoolie

As you can see in the picture, the wood boards for this skoolie ceiling are also tongue and groove. Tongue and groove boards is going to be the best way to finish your skoolie ceiling as it does the best job of hiding whatever is behind the ceiling (plywood, spray foam, insulation with duct tape, etc).
Veneer Ceiling
Finishing the ceiling with veneer sheeting is a pretty inexpensive route to take. You will need to install plywood, thin plywood so it can bend and form to the ceiling. Then, peel and stick the veneer sheeting to the plywood. Simple as that! Some veneer sheeting can actually be stained or painted to match the style you’re going for in your skoolie.
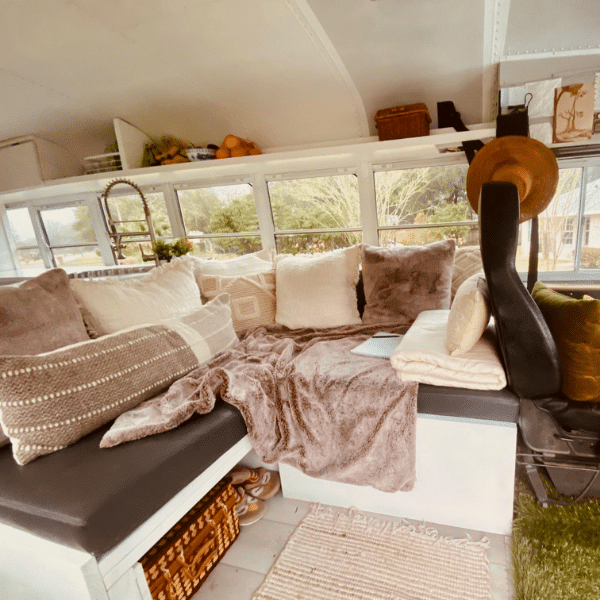
Skoolie Pallet Ceiling

This is actually our skoolie ceiling! When we knew we were doing a bus conversion, I wanted to make sure we didn’t go over budget as we were preparing on how much the conversion was going to be. When pricing out a ceiling, it was going to be around $400-600 so I thought why not use pallets to finish our ceiling. My thought was that the pallets are going to be free. We would then need to take them apart somehow, sand down all of these boards, stain them, and seal them. While this ceiling was very cheap to complete, it took us so much time to get through all of these steps!
We cut all of these boards at a 45° angle and alternated the face of the boards to give it our own “tongue and groove” style so you wouldn’t see the plywood underneath the ceiling. We absolutely love how it turned out, but it was a lot more work than just buying tongue and groove and mounting them! 🙂
Shiplap Skoolie Ceiling
Shiplap is such a nice finishing material to use in skoolie conversions. Many people use it to finish off walls so you don’t see the wood grain from the plywood used when constructing the walls. These skoolie owners decided to complete their ceiling with shiplap and it makes this bus look so bright with a pure white shiplap ceiling!
Stained 1×2 Wood Strip Ceiling
I have not seen many people use thinner wood pieces on their skoolie ceiling like this before, so this skoolie ceiling idea really caught my attention! It looks like these owners used 1×2 pieces of wood and stained them. What’s nice about using thinner pieces of wood is that you don’t have to worry about seeing what is behind the wood. Because the wood pieces are so thin, they form and curve to the ceiling very well. Such a neat idea, you could even stain them a lighter color and or paint them!
Knotty Cedar Ceiling
Cedar ceilings are just so beautiful and they go so well with butcher block countertops, which many people end up doing in their skoolie. This skoolie’s aesthetic is so very pretty but I really love the cedar ceiling most of all! The boards they chose are so knotty and I would love to stare at the ceiling all of the time. You really want to make sure you love the ceiling you choose to put in your skoolie because you are pretty much always going to be staring at it!
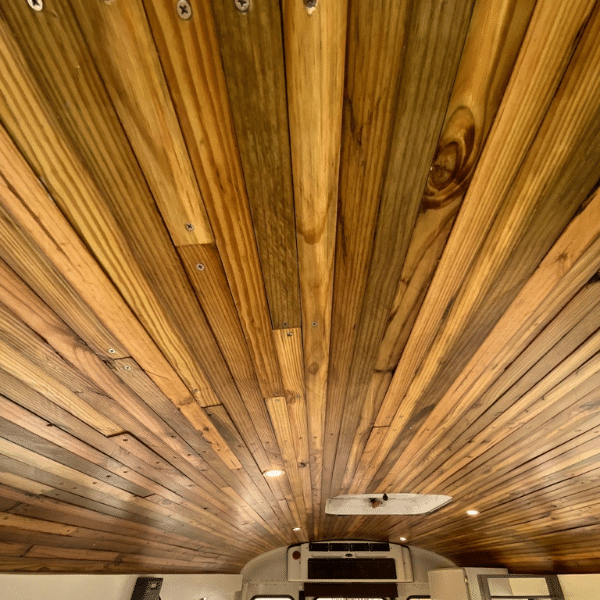
Dark Wood Slat Skoolie Ceiling

Wood slat walls have become increasing in popularity within the past few years. In a skoolie build, it’s hard to find a wall that you can do a wood slat design on. To incorporate the popular trend into your skoolie build, installing it on the ceiling is such a good idea! For this skoolie ceiling idea, you will want to install plywood onto your ceiling and paint it a similar color to the wood stain you will be using. Then, when you install the boards, just be sure to give it some space in between each of the boards. What a fun skoolie ceiling idea!
Pallet Skoolie Ceiling

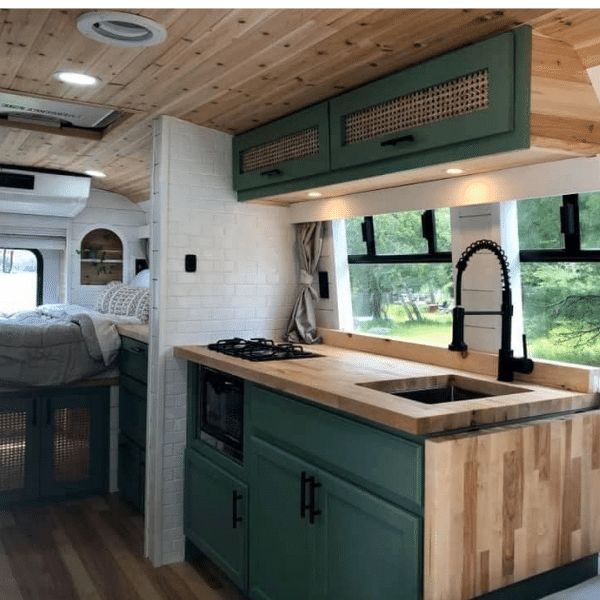
This pallet ceiling has a very cool look to it since they used a whitewash stain over the pallet. It looks so good with their dark kitchen cabinets! Once again from our experience, reclaimed pallets offer an inexpensive way to finish out your skoolie ceiling but it does take some time to complete the project. But we would say the end result is worth it!
Tongue & Groove Cedar Ceiling

Another cedar skoolie ceiling! These boards are quite easy to put up since they are tongue and groove and they just lock into place with the board next to it. If you install plywood behind the cedar boards, you could just nail these boards to the plywood. If you don’t install plywood over the insulation, then you will need to use screws to mount these boards onto the furring strips.
Plybead Panel Skoolie Ceiling
This type of finishing material on your skoolie ceiling checks two boxes in one, the plywood and the finishing board. You can find these Plybead panels at Menards or Home Depot in 4×8 sheets. If you decide to use these panels as your finishing board, be sure to mount furring strips before insulation so you can easily mount these with screws or nails.
Reclaimed Wood Ceiling

Another reclaimed pallet ceiling. I guess this is a pretty popular option to finish your skoolie ceiling 🙂 The rustic vibe of this skoolie definitely matches the type of reclaimed pallets they did for their ceiling!
While sometimes it feels like some of these bus projects are easy to get through, they really take an eagerness to learn and a lot of research, not to mention a lot of time. So take the time to research and really learn it. If you rush through things, you will end up doing things twice if not three times (trust us here, as we have done different projects a few times to get it right).