2,603
Related Course
- 35 mins
Contents
ToggleSkoolie Toilet Options
The one course you need to help you decide which skoolie toilet is right for your desired skoolie lifestyle.
Painting your skoolie isn’t just about aesthetics—it’s about protection, personality, and practicality. Whether you want a bold, eye-catching design or a sleek, modern look, the right skoolie exterior paint idea can completely transform your bus conversion.
But with so many skoolie exterior paint ideas and preparation steps to consider, where do you start? This comprehensive guide will walk you through everything from choosing the best paint options to step-by-step instructions for a flawless finish. Plus, we’ll cover budget-friendly strategies, essential tools, and maintenance tips to keep your skoolie looking fresh for years to come.
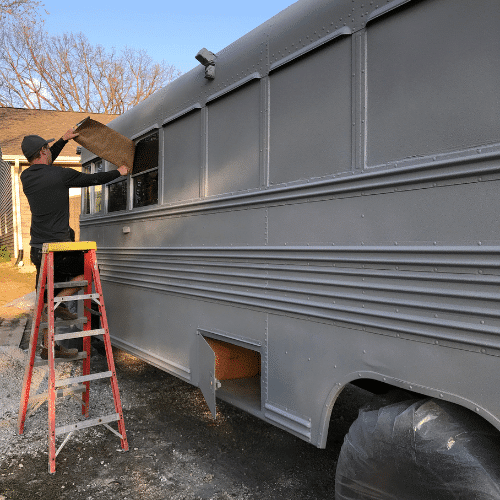
In most states, it’s common that you need to paint your school bus to get rid of the yellow color before getting it registered as a motorhome.
Ready to give your skoolie the ultimate makeover? Let’s dive in to skoolie exterior paint ideas!

Factors to Consider Before Painting
Painting a skoolie is more than just picking a color and grabbing a brush. To ensure a long-lasting, professional-looking finish, there’s a few things to consider before starting. From climate conditions to legal restrictions, these considerations will help you avoid costly mistakes and get the best results.
One of the most important factors to consider is climate and weather conditions. Painting in extreme heat or cold can cause adhesion issues, so it’s best to work when temperatures are between 50°F and 85°F. Humidity and rain can also affect the process, leading to blistering and peeling, so always check the forecast before starting.
Beyond aesthetics, durability and protection should be a top priority. Paint acts as a shield against rust, scratches, and road wear, making it essential to choose the right type. Before painting, any existing rust should be treated with a rust converter or sanded down to prevent further corrosion. Using automotive or industrial enamel paints can provide a stronger, longer-lasting finish, while adding a clear topcoat or UV-protective sealant will further extend the life of your paint job.
Popular Skoolie Exterior Paint Ideas/Themes/Trends
Choosing the right paint scheme for your skoolie is an exciting part of the conversion process. Whether you want a bold, eye-catching design or a sleek, minimalist aesthetic, your exterior paint sets the tone for your home on wheels. It’s what people will see first before they step foot to the inside of your tiny home. This is a great opportunity to let your personal style shine through.
Some popular ways to paint your skoolie are in a bohemian look with earthy tones, artistic murals, or vibrant patterns. Modern, sophisticated tones with neutral paint tones like white, soft beige, or light grey give a clean sophisticated aesthetic and the bus a polished appearance. Another great option is a outdoorsy rustic cabin vibe. This would include earthy brown, deep greens, and deep reds paint tones.
If you’re going to be traveling to the beach often, you might like a coastal cool tone vibe, such as shades of paints of light blues, seafoam greens, and sandy beiges. This will help create a relaxed, breezy feel that mimics the ocean, making you feel right at place during your beach travels.
People have been converting buses for many decades, so if you like a retro style, consider that as well with colors of sunset oranges and reds and deep teals.
No matter what color you pick, just make sure you like it and it shows off your personal style. And don’t paint it a shade of yellow.
Budget Considerations & Cost Breakdown

Painting a skoolie can be as affordable or as expensive as you make it, depending on the type of paint, tools, and whether you do it yourself or hire a professional. While a fresh coat of paint can dramatically enhance your skoolie’s appearance, it’s important to budget wisely so you don’t overspend or cut corners on durability. Let’s break down the costs and what you can expect at different budget levels.
DIY vs Professional Painting
If you’re looking to paint your skoolie on a budget, a DIY paint job can cost anywhere from $200 to $800 on the low end, depending on the materials and tools you use. Rolling on paint is the cheapest method, but it requires patience, multiple coats, and careful prep work to minimize streaks and roller marks. Spraying gives a smoother, more even finish, but it requires a paint sprayer and more precise technique. Many DIYers find that while their paint job may not look perfect up close, it still holds up well on the road and looks great from a distance.
For those who want a flawless, long-lasting exterior, hiring a professional painter is the best option, but it comes at a cost—typically ranging from $3,000 to $8,000. Professional painters use automotive-grade enamel or urethane paints, ensuring a durable, weather-resistant finish. They also have the expertise to prevent drips, streaks, and uneven coverage that can happen with DIY attempts. While this option is significantly more expensive, it may be worth the investment if you want a showroom-quality finish with minimal maintenance required.
Spending More vs Less on Painting
Going with a budget-friendly approach means making some trade-offs in terms of finish and longevity. Lower-cost paints, such as acrylic latex or standard enamel, may fade faster or require more frequent touch-ups, especially if the skoolie is exposed to extreme weather. Hand-painting or rolling the exterior instead of spraying can also result in visible brush strokes or uneven application. However, if your goal is simply to cover up old paint, prevent rust, or give your skoolie a fresh new look, a lower-budget DIY job can still get the job done.
On the other hand, spending more on high-quality paint and professional application ensures your skoolie looks polished and holds up for years with minimal upkeep. Premium automotive paints provide better UV resistance, durability, and a sleek, even finish, making them ideal for those who want their skoolie to stand out in any setting.
Ultimately, the decision comes down to your priorities and budget. If you’d rather save money for mechanical upgrades, interior renovations, or travel expenses, a DIY approach is a practical choice.
Tools & Supplies Needed for Painting the Exterior of Your Skoolie
A great paint job starts with the right tools and materials. There are a lot of skoolie exterior paint ideas to pick from and depending on the paint type, you’ll need varying tools. Whether you’re rolling, brushing, or spraying, proper preparation and quality supplies will make all the difference in how your skoolie turns out. Below is a breakdown of the essential tools and supplies you’ll need to get the job done right.
Cleaning & Prep Supplies
Before applying any paint, your skoolie must be thoroughly cleaned and prepped to ensure proper adhesion.
- Pressure Washer or Hose & Scrub Brush – Removes dirt, grime, and loose paint.
- Degreaser or TSP Cleaner – Helps strip off grease, oil, and contaminants from the surface.
- Sandpaper (80- to 220-grit) or Sanding Blocks – Smooths the surface and removes old, peeling paint.
- Rust Converter or Rust Remover – Essential for treating rust before painting.
- Body Filler or Bondo – Fills dents, holes, and imperfections for a smooth finish. (Primarily for shuttle buses buses with a fiberglass body).
Masking & Protection Supplies
To achieve clean lines and prevent paint from getting on windows, trim, or tires, you’ll need:
- Painter’s Tape (Blue or Green Masking Tape) – For crisp edges and clean separations between colors.
- Plastic Sheeting or Drop Cloths – Protects windows, lights, and other areas you don’t want painted.
- Old Newspapers or Cardboard – Budget-friendly alternatives for covering windows and trim.
Priming & Painting Tools
The right tools will depend on whether you choose to roll, brush, or spray your paint.
- Paint Rollers & Roller Covers (High-Density Foam or Nap Rollers) – Best for a DIY roll-on method.
- Paintbrushes (Various Sizes) – For edges, details, and touch-ups.
- HVLP or Airless Paint Sprayer – Provides a smooth, professional-looking finish but requires more skill and setup.
- Paint Trays & Liners – Holds paint for rolling applications.
- Buckets & Stir Sticks – Ensures proper paint mixing.
Paint & Primers
Using the right primer and paint type will improve adhesion, durability, and weather resistance.
- Automotive or Industrial Primer – Helps paint adhere better and prevents rust.
- Paint Type (Enamel, Acrylic, Oil-Based, or Bed Liner Coating) – The best type depends on durability needs and desired finish.
- Clear Coat or Sealant – Protects against UV damage and adds longevity to the paint job.
Safety Gear & Misc Supplies
Painting involves fumes, dust, and chemicals, so safety should be a priority.
- Respirator or Paint Mask – Essential for filtering out paint fumes and dust.
- Protective Eyewear – Shields your eyes from overspray and debris.
- Gloves – Keeps hands protected from chemicals and paint.
- Coveralls or Old Clothes – Prevents paint stains on your clothing.
All the Skoolie Exterior Paint Ideas

Choosing the right paint for your skoolie is essential for durability, aesthetics, and long-term protection against the elements. The best paint type depends on factors like budget, climate, and how much effort you want to put into maintenance. Below, we break down the most popular skoolie paint options, including their pros, cons, and best use cases.
Acrylic
Acrylic paint is water-based and known for its ease of use and quick drying time. It provides excellent UV resistance, protecting your skoolie from fading in direct sunlight.
- Application: You can apply acrylic paint with a brush, roller, or sprayer.
- Durability: It offers decent abrasion resistance and flexibility, expanding and contracting with temperature changes.
This type of paint also cleans up easily with soap and water, making maintenance straightforward.
Enamel
Enamel paint is oil-based and provides a hard, glossy finish, ideal for those looking for a sleek look. Its durability against weather conditions makes it a popular choice for skoolie exteriors.
- Finish: The high-gloss finish is resistant to chips and scratches.
- Longevity: Once cured, it’s known for lasting many years without significant wear.
You’ll need mineral spirits for cleanup, so consider this when planning your project.
Oil-Based
Oil-based paints are known for their robust coverage and durability. These paints are suitable if you live in an area with harsh weather conditions.
- Application: They require careful application, as brush marks can remain if not done correctly.
- Finish: Oil-based paints often yield a smooth, hard finish that protects against moisture.
Drying times are longer than other options, so plan your painting schedule accordingly.
Truck Bed Liner
Using a truck bed liner for your skoolie’s exterior offers unique advantages. It’s exceptionally durable and resistant to abrasions, making it ideal for off-road or rough terrain.
- Texture: The texture provides additional grip and prevents slipping on the surface.
- Waterproof: This type of coating also offers excellent waterproofing, keeping your skoolie safe from leaks.
Application might be more technical, often requiring a spray gun. Looking to learn more about truck bed liner? Read our in-depth skoolie truck bed liner paint job post here.
Reflective Roof Coatings
If energy efficiency is a priority, reflective roof coatings are beneficial. They reflect sunlight and help keep the interior of your skoolie cooler in hot weather.
- Energy Savings: Reflective coatings can reduce cooling costs significantly by minimizing heat absorption.
- Application: These coatings can be applied over an existing roof surface, providing an additional layer of protection.
Be mindful of the product specifications to select one suitable for your skoolie’s material.
Step-by-Step Guide to Painting the Exterior of Your Skoolie
Painting your skoolie is a major transformation that requires careful preparation, patience, and the right technique. Whether you’re rolling, brushing, or spraying, following a step-by-step process ensures a smooth, long-lasting finish. Below, we break down everything you need to do—from prep to final coats—to give your skoolie a professional-quality paint job. Remember that this could be the first time your bus is getting a wash in however many years since it was manufactured. Think about how many miles are on it and how much road grime that’s caked onto the paint and in the wheel wells.
Removing Any Stickers
First things first, and that is to remove any stickers such as the bus number, the “school bus”, the bus district’s name, etc. We used a heat gun and a paint scraper to scrape each one off.
Wash the Bus
Start by thoroughly cleaning the exterior of your skoolie. Use a mixture of water and a mild detergent in a pressure washer or hose with a scrub brush to remove dust, dirt, grease, and grime. Focus on sections around windows, doors, and wheel wells, as these tend to accumulate more dirt.
Rinse off all detergent with a garden hose or with water-only pressure washer. Ensure no soap residue remains, as it can affect paint adhesion. Allow the bus to dry completely before proceeding to the next step.
(We were thinking about painting our wheel wells, so we went through the process of giving them a real good wash and it was unbelievable how many layers deep of grime was stuck on there. We never got it all off. But after cleaning them, we decided we did not need paint after all, just a deep clean.)
Sand
Once the skoolie is dry, begin sanding the surface by using an orbital sander, sheet sander, or belt sander. The grit should be between 120 and 220. This will be a very tedious process but it is crucial for creating a good base for the paint to adhere to. If your bus has ribs on it, make sure to sand all parts of the ribs VERY good. (That is where our bus is starting to show the most signs of paint not adhering).
Wash the Bus Again
After sanding, wash the skoolie again using clean water only, no soap to get the sanding dust off of the bus. Dust created during sanding can interfere with the paint. Once washed, let the bus dry completely before moving forward. Any moisture can hinder paint adhesion, so patience is key here.
Taping Windows
Before applying primer or paint, use painters tape (frog tape is what we used) to tape off windows and any sections you don’t want paint to get on. If spraying, use either plastic wrap or paper wrap to cover the windows and mirrors, and anything else you don’t want paint to get on.
Double-check your taping for any missed areas before priming and painting. Proper taping prevents paint bleed and saves time during cleanup. Again, this is a very tedious process but completely necessary for a great finished paint job.
Priming
Depending on what type of paint you are using, it’s time to prime. Choose a primer suitable for metal/steel surfaces. A spray application can yield even coverage. Apply the primer in thin, even coats and per the manufacturer’s instructions.
Painting
After your skoolie is primed, you can move on to applying your chosen paint. Select an exterior paint suitable for vehicles, as this will withstand exposure to the elements.
Using a paint sprayer can help achieve a smooth, even coat. Alternatively, use a high-quality roller or brush designed for exterior applications. Work in small sections for better coverage.
Apply multiple thin coats rather than one thick coat. This approach enhances durability and minimizes drips. Allow adequate drying time between coats per manufacturer’s instructions.
Maintenance Tips for Skoolie Exterior Paints
Here are some essential tips for maintaining your fresh skoolie exterior paint job!
Regular Cleaning
Every few months, wash the exterior with mild soap and water with a pressure washer. (It’s the fastest way to get rid of the dirt and grime.)
Inspect for Damage
Check for any signs of peeling or chipping paint.
Touch-Up Paint
Keep a small amount of your original paint for touch-ups. Apply touch-up paint whenever you notice any damage.
Sealant Application
Consider applying a clear sealant over your paint. This adds extra protection against UV rays and moisture.
Avoid Harsh Chemicals
Stay away from abrasive cleaners and harsh chemicals, which can damage the paint’s finish.
Shade and Protection
Whenever possible, park under shade or use a cover. This reduces sun exposure and prolongs the life of your paint.
Monitor Moisture
Keep an eye on areas where water could accumulate. Moisture can lead to paint failure and rusting.
Join the Skoolie Livin Community!
Related Course
Skoolie Toilet Options
Get the complete overview of skoolie toilet options to help you decide which one is right for your desired skoolie lifestyle.
- 35 mins